How To Track Shopify ‘Add To Cart’ Clicks with Google Analytics and Google Tag Manager
First, I must say that my English is not well. But I tried to write this manual for those who do not know JavaScript. And I hope that someone will be able to figure it out and it will be useful to him.
What is the problem?
For better analytics, we need to send to Google Tag Manager data about the product that the user adds to the cart. To do this, we must react to the button and create a so-called event.
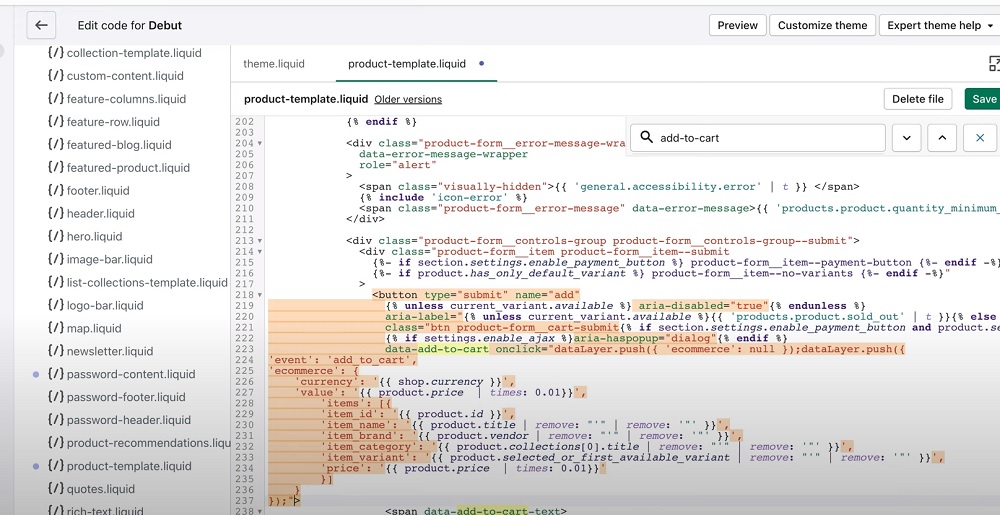
On the Internet I finded only one serious manual on this from Benjamin Mangold. But it has several problems:
- It is only suitable for the template (theme) that the author uses. Since if you have a different theme, you will not find a button in that place. I would show you how to do it in other templates, but it’s long to write and not always possible.
- The submit button can sometimes be elsewhere in the code. For example, a button on a category page may be different in some templates and then it will not generate an event.
- And finally, the way to hang the code directly on the button is considered very rude in terms of the beauty of the code. In my country they call it shit-code. Although my method, described here, is also not ideal in terms of code cleanliness. I also simplified it a little to make it easier to understand.
What way do I propose?
To be honest, I don’t work with Shopify. I specialize in application development. It just had to be done this task quickly. But I know that there are paid plugins for Shopify that can solve this problem out of the box. It seems that Adscale does it, for example. But we will connect similar functionality for free.
How is my method different?
We won’t assign actions to a button, as Benjamin Mangold showed in video. Instead, we will keep track of when our site sends a request to add a product to the database. And then execute an event that will send the data to our GMT.
The manual itself
1. Create a file to host our code
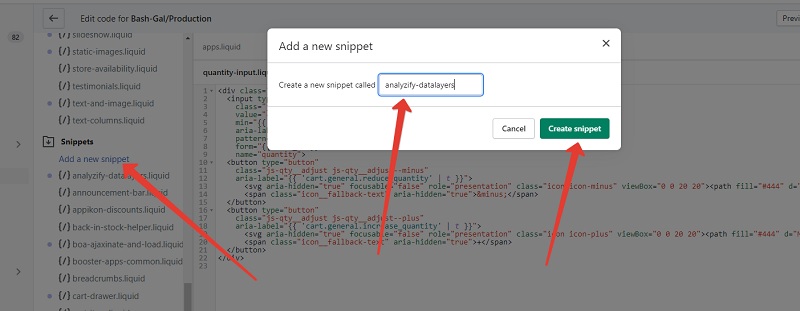
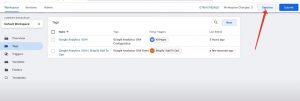
1) Let’s create a file for our code. It will be the only one. Go to Themes – Actions – Edit Code. On the left, scroll down and find the Snipptes folder. Click «Add a new snippet». And write an arbitrary name. I have it «analyzify-datalayers«.
2) Now to find this created file on the left in the list and add the first code to it.
<script>
  (function (ns, fetch) {
    if (typeof fetch !== 'function') return;
    ns.fetch = function () {
        const response = fetch.apply(this, arguments);
        response.then(res => {
            if ([
                `${window.location.origin}/cart/add.js`,
                `${window.location.origin}/cart/update.js`,
                `${window.location.origin}/cart/change.js`,
                `${window.location.origin}/cart/clear.js`,
            ].includes(res.url)) {
              res.clone().json().then(data => alert('OUR FILE IS WORKING'));
            }
        });
        return response;
    }

}(window, window.fetch))
2. Attaching a file to a theme
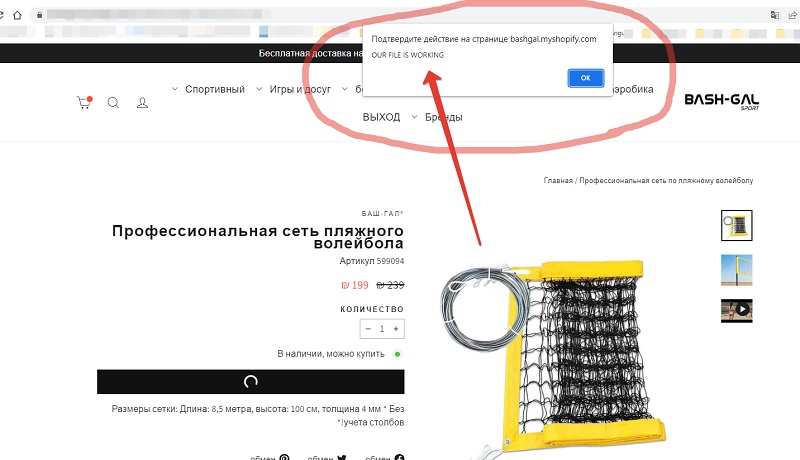
Our file is half done. This code will keep track of sending requests to the server, and when it is adding to the cart, then react. For now just it will show a popup saying «OUR FILE IS WORKING». But while the file is not connected to our template. Those. our theme does not know about it.
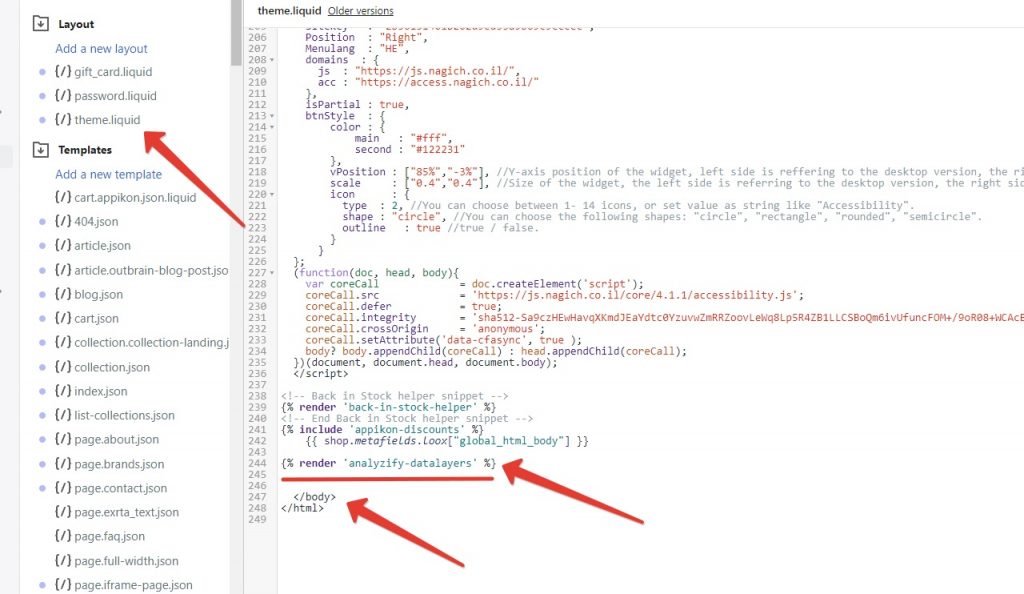
Let’s include this file. You need to scroll from the left to the beginning to the «theme.liquid» file. At the very bottom, before the </body> tag, you need to add a line of code with the name of our created snippet.
{% render 'analyzify-datalayers' %}
3. Checking the connection
Now you can check if the code works. To do this, go to the site and add something to the cart. If you see a pop-up window after clicking, then everything is ok.
4. Adding a code to send an event to the GTM
Everything is almost ready. It remains to replace our code for displaying a pop-up window with a real code that will send an event to GMT.
To do this, we return to our analyzify-datalayers.liquid. There we see the line alert('OUR FILE IS WORKING'). Of course, we don’t need this. Instead of this line, you need to add the function updateDataLayer(data).
<script>
  (function (ns, fetch) {
    if (typeof fetch !== 'function') return;
    ns.fetch = function () {
        const response = fetch.apply(this, arguments);
        response.then(res => {
            if ([
                `${window.location.origin}/cart/add.js`,
                `${window.location.origin}/cart/update.js`,
                `${window.location.origin}/cart/change.js`,
                `${window.location.origin}/cart/clear.js`,
            ].includes(res.url)) {
              res.clone().json().then(data => updateDataLayer(data));
            }
        });
        return response;
    }

}(window, window.fetch))
</script>
In brackets, we pass data variable. It’s our product. This is a wonderful feature that we got thanks to request interception.
But in fact, there is no updateDataLayer function itself yet. We need to write it a little lower. And there are already a lot of options. You can just take the Benjamin Mangold function from his blog, which he added on the button in the video. Это будет выгдядеть так:
The file will look like this:
Simple working option
<script>
  (function (ns, fetch) {
    if (typeof fetch !== 'function') return;
    ns.fetch = function () {
        const response = fetch.apply(this, arguments);
        response.then(res => {
            if ([
                `${window.location.origin}/cart/add.js`,
                `${window.location.origin}/cart/update.js`,
                `${window.location.origin}/cart/change.js`,
                `${window.location.origin}/cart/clear.js`,
            ].includes(res.url)) {
              res.clone().json().then(data => updateDataLayer(data));
            }
        });
        return response;
    }

}(window, window.fetch))

function updateDataLayer(product) {
    if (product.status && product.status == 422) return
    dataLayer.push({ 'ecommerce': null });dataLayer.push({
     'event': 'add_to_cart',
      'ecommerce': {
        'items': [{
          'item_id': '{{ product.id }}',
          'item_name': '{{ product.title | remove: "'" | remove: '"' }}',
          'item_brand': '{{ product.vendor | remove: "'" | remove: '"' }}',
          'item_category': '{{ product.collections[0].title | remove: "'" | remove: '"' }}',
          'item_variant': '{{ product.selected_variant.sku }}',
          'currency': '{{ shop.currency }}',
          'price': '{{ product.price  | times: 0.01}}'
          }]
  }
});

}
</script>
You can see the line if (typeof fetch !== 'function') return; here. This line is optional. This simply checks if the item is still in stock and breaks the function (makes a return). We passed the item to be sent to the cart to the function in parentheses. And Shopify, if it knows that the product is not enough, instead of the product object, it passes another object with a status of 422. If the line is removed, then nothing terrible will happen. But in analytics, you will see an add to cart that didn’t happen. It’s up to you to decide if you need it in analytics.
My version of the code (more complex)
As I said earlier, we get the product itself when intercepting the request. Therefore, we have a little more options than just taking fields from the page.
<script>
  (function (ns, fetch) {
    if (typeof fetch !== 'function') return;
    ns.fetch = function () {
        const response = fetch.apply(this, arguments);
        response.then(res => {
            if ([
                `${window.location.origin}/cart/add.js`,
                `${window.location.origin}/cart/update.js`,
                `${window.location.origin}/cart/change.js`,
                `${window.location.origin}/cart/clear.js`,
            ].includes(res.url)) {
              res.clone().json().then(data => updateDataLayer(data));
            }
        });
        return response;
    }

}(window, window.fetch))


function updateDataLayer(product) {
    if (product.status && product.status == 422) return
    const currency = {{shop.currency | json}};

    const collection = {{colection | json}} || null;

    const category = collection?.title || item?.Categories[0] || 'from search'
    const category2 = item?.Categories ? collection?.title ? item.Categories[0] : item.Categories[1] : ''

    let newItem = {
        item_id: product.id.toString(),
        item_name: product.product_title.toString(),
        affiliation: "Some text if desired optionally",
        currency: currency || '',
        item_brand: product.vendor || '',
        item_category: category,
        item_category2: category2,
        item_variant: product.variant_options.length && product.variant_options != 'Default Title'  ? product.variant_options[0] : '-',
        price: '{{ product.price  | times: 0.01}}',
        quantity: document.querySelector('input[name="quantity"]') ? document.querySelector('input[name="quantity"]').value.toString() : product.quantity.toString()
    }

      dataLayer.push({ ecommerce: null });
      dataLayer.push({
        'event': 'add_to_cart_new',
        ecommerce: {
          items: newItem
        }
    });

}
</script>
Attention! This code may be redundant for you, and it may also cause errors for you (maybe the same fields will be empty or the event will not come in GTM). For example, errors may be due to the line where we take the quantity. I take the quantity of items directly from the user input field (visual part of the page). And if this field in your theme is different, then the amount of items has formed in the cart at the moment will come. It’s not that scary. Depends on what you want to see.
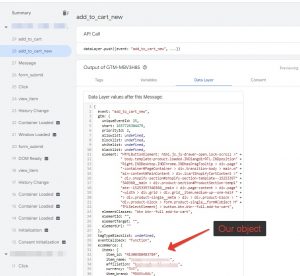
How to check if an event come to GMT
There are 2 ways to do this.
1) Install extension Tag Assistant Legacy (by Google)

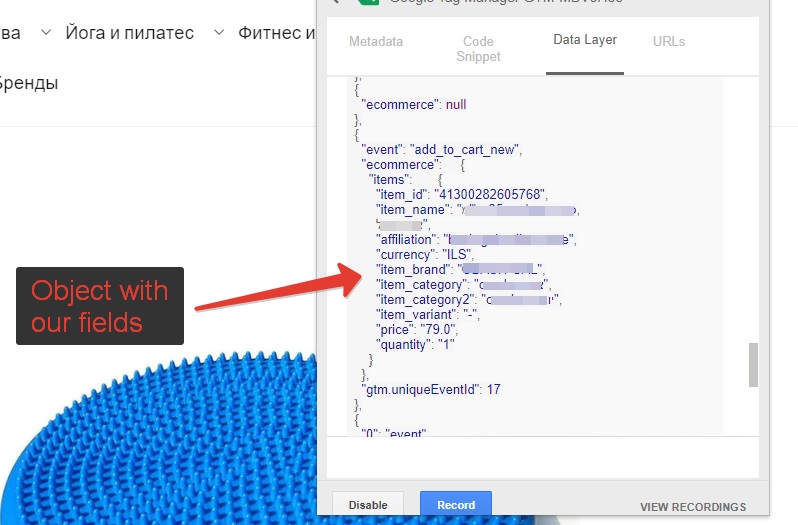
2) Go to Google tag manager and switch to preview mode (this link will open https://tagassistant.google.com/). In the window with tour site that appears, add the product to the cart and see the event in tagassistant.